Brand Your Survey Header
Make your surveys look great and stand out with your brand's own design language. Create a custom survey title, description, and logo for your survey header to make the entire form look more professional and increase brand recognition. This demo shows how to add a survey title, description, and your company logo to the form header. Read more...
Make your surveys look great and stand out with your brand's own design language. Create a custom survey title, description, and logo for your survey header to make the entire form look more professional and increase brand recognition. This demo shows how to add a survey title, description, and your company logo to the form header.
Add a Title and Description to the Survey Header
To add a short survey title, assign it to SurveyModel's title property. You can also display a longer survey description under the title. Use the description property to specify description text.
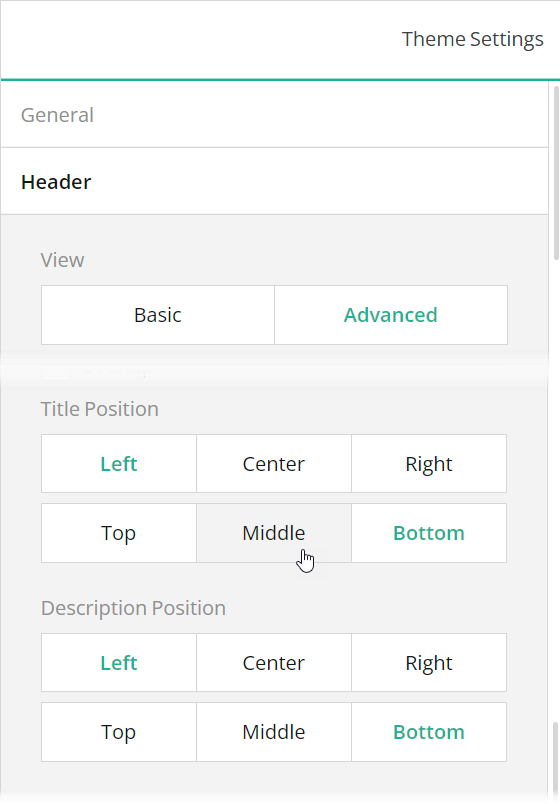
Survey title and description are aligned to the left corner of the form header. You can specify a different position for them using a custom theme. To do this, set the following properties in the theme JSON schema (see the theme.js file in this demo):
header.titlePositionX:"left"(default) |"right"|"center"header.titlePositionY:"bottom"(default) |"top"|"middle"header.descriptionPositionX:"left"(default) |"right"|"center"header.descriptionPositionY:"bottom"(default) |"top"|"middle"
To apply the positioning settings, change the headerView property value to "advanced" in the theme JSON schema.
If you are configuring your survey in Survey Creator, switch to the Themes tab to open an integrated Theme Editor. To position the survey title and description, expand the Header category, switch the View editor to "Advanced", and use the Title position and Description position editors.
Add Your Logo to the Survey Header
To add your logo to the survey header, assign an image URL or a Base64-encoded image to SurveyModel's logo property. You can use the logoWidth and logoHeight properties to specify logo dimensions.
To position a logo image within a survey header, create a custom theme and set the following properties in it (see the theme.js file in this demo):
header.logoPositionX:"right"(default) |"left"|"center"header.logoPositionY:"top"(default) |"bottom"|"middle"
To apply the positioning settings, change the headerView property value to "advanced" in the theme JSON schema.
You can apply the same settings in Survey Creator: open the Themes tab, expand the Header category, switch the View editor to "Advanced", and use the Logo position editors to align your logo image within the survey header.
A logo can be automatically resized to fit into its container. Set the logoFit property to specify the mode used to resize the logo: "contain" (default), "cover", "fill", or "none". Refer to the object-fit CSS property description on MDN for more information.
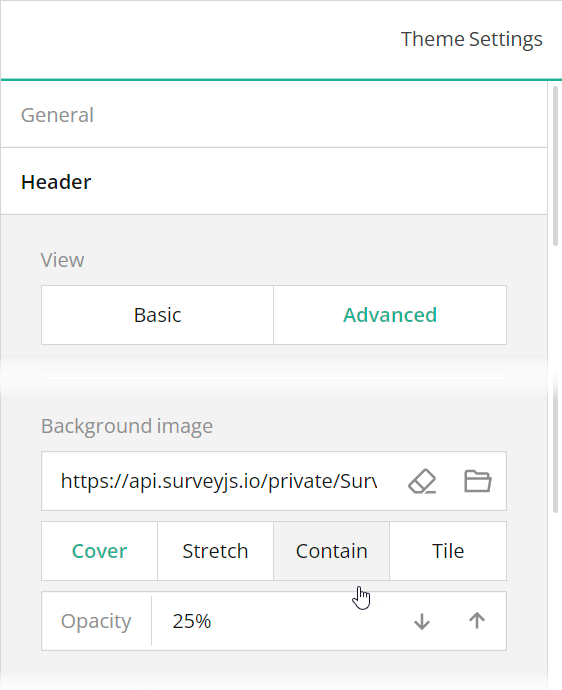
Add a Background Image to the Survey Header
A form header can display an image in the background. To configure the image, create a custom theme and specify the following properties in it (see the theme.js file in this demo):
header.backgroundImage:string
An image to display in the background of the header. Accepts a hyperlink or a base64-encoded image.header.backgroundImageOpacity:"cover"(default) |"fill"|"contain"|"tile"
A string value that specifies how to resize a background image to fit it into the header.header.backgroundImageFit:number
A value from 0 to 1 that specifies how transparent the background image should be: 0 makes the image completely transparent, and 1 makes it opaque. In Theme Editor, the opacity values are mapped to a scale from 0% to 100%.
To apply these settings, change the headerView property value to "advanced" in the theme JSON schema.
To configure a background image in Theme Editor, expand the Header category, switch the View editor to "Advanced", and use the Background image editors.
Enable Overlap Between the Header and Survey Contents
A survey header can be displayed back to back with the first question or be slightly overlapped by it, as shown in this demo. To set the overlapEnabled property to true in a theme JSON schema or select the Header > Overlap checkbox in Theme Editor.